
I have wanted a labyrinth in my backyard for years. When a friend mentioned how much it cost (and how long it takes) to have a professional create one, I knew I would be DIYing it. The labyrinth needed to be about 10 feet in diameter to fill the level area available. The walking area needed to be about 18 inches across to allow my big feet (size 10 y’all) to comfortably stroll. Using middle school math skills (see it does come in handy) and hours on Pinterest, I decided on this design.

You can probably tell from the sketch, that perfection was not my goal. A completed attractive and functioning labyrinth was. I got a pile of old bricks for free. I piled them up in the labyrinth space and took loads of them until I estimated there would be enough (no math this time, I guessed).

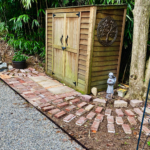
The down side of this approach is that I had to move the bricks out of the way to create the space for the labyrinth. I planned to use cardboard as a barrier to prevent weeds, but even covered in mulch it felt weird to walk on – so I ditched that plan. Clearing the area was the first step, removing twigs, rocks, acorns, gum balls, etc. You do not want to feel those under your feet and bricks won’t sit flat. If I were more enterprising I would have dug in a bit, I am too lazy, too impatient, and too old for that. Then I created concentric circles roughly 18 inches apart. Doing that made creating the labyrinth much easier.

It took a few hours and help from a friend to lay out the walking pattern. It took some tweaking to get the pattern right. It was helpful to have a friend walk the labyrinth and make tweaks as well. Once we both thought it was good enough, I filled in the walking path with shredded dark mulch to make the path more visible, reduce weeds, and create a more comfortable walking path.

Once the labyrinth was complete, it looked abandoned. It was isolated in the yard, which looked weird (and frankly it gave sad and alone vibes – not good). I used leftover bricks (and got another pile) to tie the labyrinth in with the rest of the landscape. The walking path I created begins wider and tapers down to roughly the same width (about 18 inches) as the paths inside the labyrinth. Once I was pleased with the walking path, I filled it with the same mulch I used in the labyrinth.

I really like that the path narrows a bit as you get closer to the labyrinth. It’s a visual cue to focus. I switch what I place at the center of the labyrinth from time to time to keep it interesting, and because I cannot leave well enough alone. At some point, I will create a flower garden next to the labyrinth so it defines the space even more and looks and smells wonderful. That’ll come later.